This article will discuss what constitutes the simplest household incubator and how you can make it yourself without large investments. Components of a domestic incubator may vary depending on whether you want to make it fully manual, semi-automatic or automatic.
You will need:
- cap with viewing window;
- body;
- lattice for eggs;
- light bulbs with chamber;
- containers for water;
- fan by 12 V;
- Regulator voltage 12 V;
- thermometer;
- thermostat;
- thermal sensor;
- controller frequency of coup (digital timer).
Table of contents
Types and size of incubators
What is it possible to do this useful thing at home?
- of foam plastic;
- from cardboard the boxes;
- of plywood or wood;
- from old the fridge.
This list is not final. The specified list of different materials involves the manufacture of a cover and body of these materials. A detailed description, characteristics and design of each type of incubator can be found below.
Incubator Sizes will depend primarily on:
- egg quantitieswhich you will be putting.
- from location light bulbsthat heat the incubator.
For reference: with an average incubator length of 450–470 mm and a width of 300–400 mm, the capacity of the eggs, pcs. (depending on size):
- chicken to 70;
- duck or turkey up to 55;
- goose up to 40;
- quail to 200.
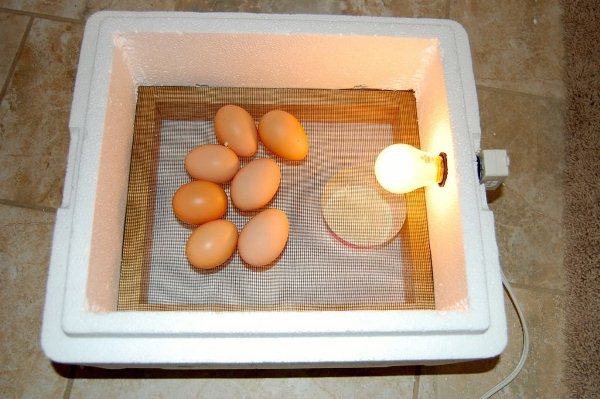
Homemade foam incubator, description and drawings
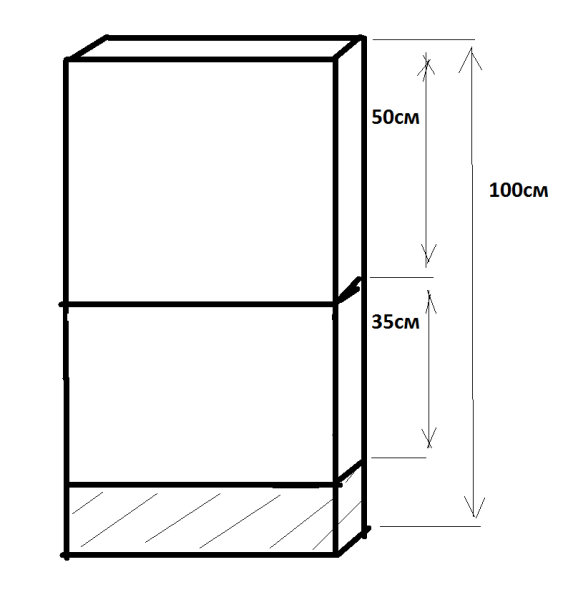
You will need: sheets of polyfoam (expanded polystyrene) 50 x 100 cm in size. Thickness - 50 mm.
Mark the sheet with a pencil and a ruler. Dimensions take arbitrary. Example:
Side wall: Length - 50 cm., Height -50 cm.
End wall: length - 35 cm., height - 50 cm.
Cut the foam in size with a sharp knife. If the foam is not extruded, it is better to cut office knife - it is very sharp, the blade is thin.
Do the same with the second sheet.
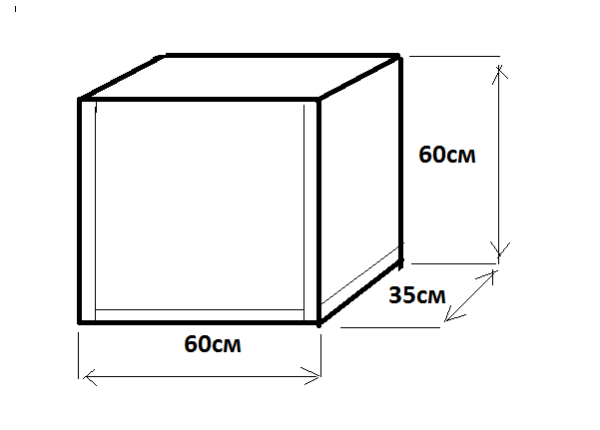
Further we collect the body in accordance with the drawing. This is done with rubber glue or simply wrap the joints with a wide adhesive tape. Thus, we get the side, end and bottom of the case. In the bottom of the casewhich is also cut to the dimensions of the walls, be sure to make 2-3 holes for air ventilation.
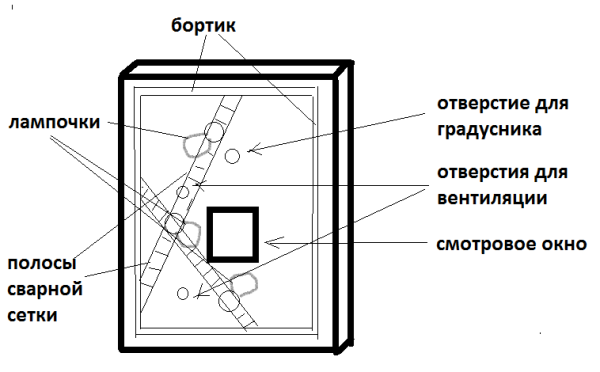
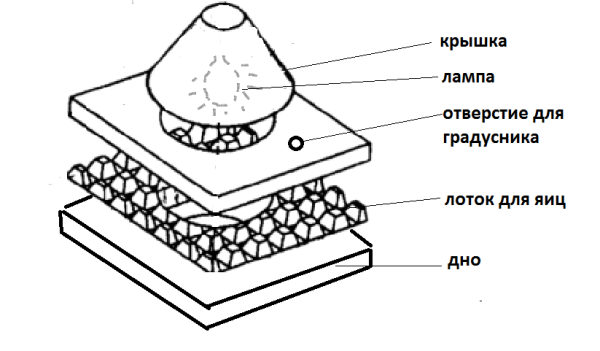
Cover we manufacture separately with a viewing window and a pair of holes for ventilationas shown in the diagram below.
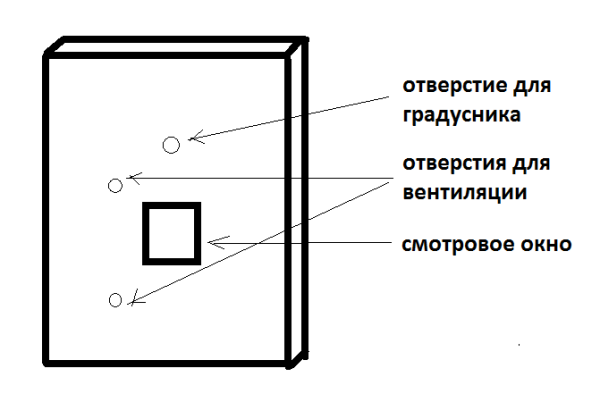
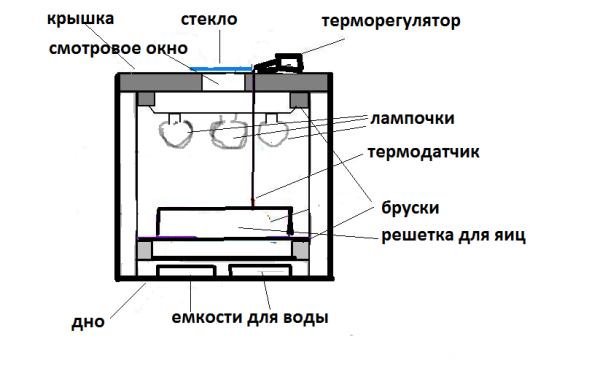
Glass "Tightly" do not need to fix. After the chicks appear, we regulate the temperature in the incubator, pushing it a quarter or half. The proposed design of the incubator assumes that it will be heated by three electric 25 watt bulbsThis is sufficient to maintain the required temperature. The lid must be made with partially cut edges so that it does not move along the body. For this purpose, you can also stick bumpers. The material used wooden sticks or bars of foam.
On the cover, fasten three electric cartridge with light bulbs.
From above we install a temperature regulator (if the design assumes it).
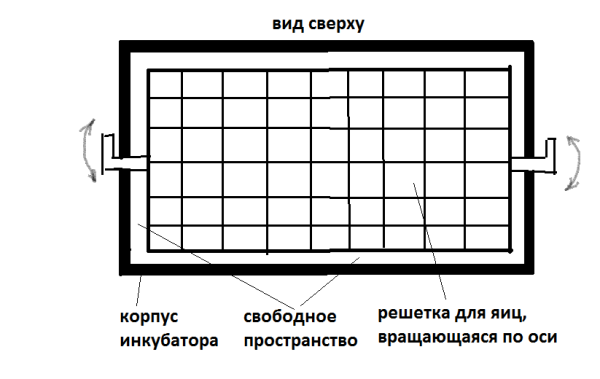
The grid for eggs is made of welded galvanized mesh 16 x 24 mm, closed from the inside with a plastic mosquito net. The netting is necessary so that the little chicks do not fall into their cells with their paws. In addition, they stick their heads in the cells, which ends for them (and for you) pitiably. On the grid we increase bumpers (walls), the height of which must not be lower than 8 - 10 cm, otherwise chicks will jump over it. If you do not plan to roll the eggs, turning the lattice along its axis, then the ribs make a smaller lattice along the entire perimeter, and the lattice will cover the entire inner space of the incubator, and will lie on the bars. In this design you will have turn each egg by handby marking them from one side with a plus (+), and on the other, respectively - with a minus (-). Come up with your notation.
This design can improve, having equipped it with usual computer 12-volt fan, using a voltage regulator, an adapter (12 volts respectively) and a thermostat.
You can construct an indicator with heated by light bulbswhich will be located below, under the tray (lattice) with eggs. Then the design will be more compact. Its height may not exceed 25-30 cm. Bulbs and chambers for them can be taken such as in an ordinary household refrigerator. You can use a different type of heater (film from underfloor heating systems).
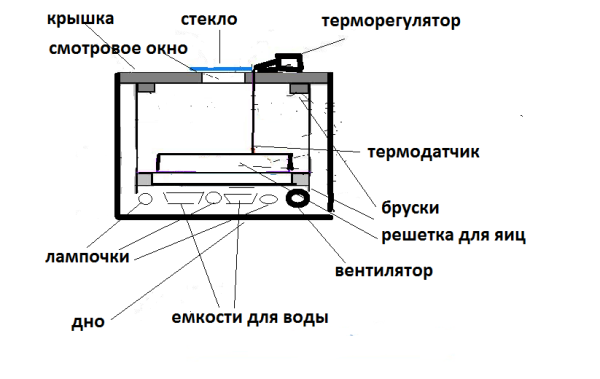
To do not turn every eggit is possible to place the grid (tray) not on the bars on the bottom, but to make holes closer to the bottom of the incubator, put the sleeves there, attach the grid to the sleeves with corners or other clips. Attach pens or holders to the outside. Thus, the lattice can be rotated along its axis, changing the degree of egg slope and, accordingly, heating one side of the eggs, then the other.In this case, the grid should be smaller than the inner walls of the incubator, so that it can change the angle of inclination without interference. Racks of lattices then they should be taller than 5 cm, because otherwise chicks can roll over the side and fall to the bottom of the incubator to light bulbs and containers with water.
Out of carton box, diagram and device
Perhaps the easiest and cheap incubator option - it is a design from a cardboard box. Cardboard is very inferior in strength to all other materials, so this type of incubator has certain features.
Air vents 3-4cm from the bottom; on the side walls, at a distance of 6-7 cm from the bottom, we attach wooden slats to the walls. You can put in place of slats bars on the bottom of the box, which we cover with foil. It must be larger than the bottom in order for its edges to penetrate the walls. On pallet install any container with water.
On the slats or bars lay the usual packaging for eggs. Cut a hole in the middle for the best air ventilation. The box produces a cover with two two holes: in the middle, for the lamp, and on the side for the thermometer.
Out of plywood do it yourself
If you make an incubator from this material, then the walls must be double. The top cover, as in the previous versions, is made removable. In it cut a viewing window with glass. Do ventilation holes similar to previous versions.
From the inside of the incubator mounted lamp holders, and below the rake for the tray is nailed. In the plywood floor we also drill holes for ventilation. They may be 4-10 pieces.
Tray or egg grid also arrange a framework type. Put a mosquito net or a construction net for putty on the grill. The incubator is installed in a warm room.
From the old refrigerator
If you have a farm old fridgewhich you have managed to replace with a new one, and the old one has not yet been thrown away, you can use it as a homemade incubator.
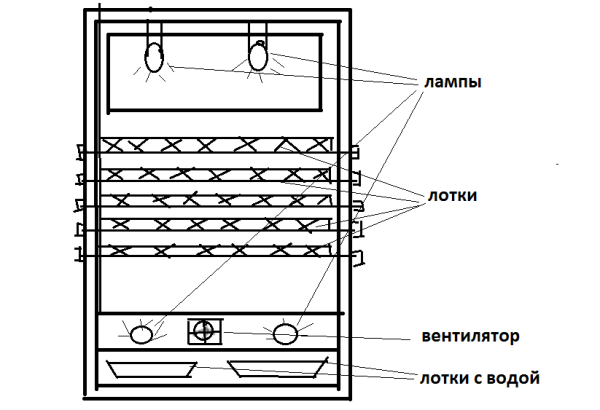
We throw away all the excess, including the freezer. Made from above air vents. At the bottom of the incubator, they are also made. Set down 12 volt fan.
Next you need to install heaters. This role is performed by electrical 25 watt bulbs. You need 4 such bulbs. Two bulbs are placed in the upper part of the refrigerator, and two in the lower part. At the bottom we fix chambers in such a way that at the bottom there is an opportunity to place a tray with water.
Egg trays are also made from galvanized welded wire mesh with sides. If you choose plastic boxes from the fruit as the material, that’s fine too. Then they are cut to a height of 6 cm. All trays are mounted on the axle and communicate with each other with a strap, with which the slope of the eggs is changed.
Auto
In some of the foregoing, the proposed manufacture manual or semi-automatic incubator. To make automatic incubator, you must additionally purchase:
- block thermostat;
- tray automatic egg flipwhich turns the eggs at a certain angle;
- frequency controller coup (timer).
Differences in temperature conditions for different types of birds
In the first two days you need to warm the eggs well, so the temperature in the incubator is set at 38–38.7 ° C.
Chicken eggs in the first days of incubation, they are kept at a temperature of from 39 to 38 degrees, gradually lowering it. In the last days (20-21) - 37.6.
Duck - from 37.8 to 37.1 degrees for a fall.
Goose - from 38.4 to 37.4.
Turkeys - from 37.6 to 37.1.
Quail all 17 days of incubation incubated at an equal temperature of 37.5 degrees.
As you see, doing house incubatorThe material can be diverse and depends on what is at hand. In order to orient the reader, what will be the financial benefit from this event (meaning the difference between a ready-made incubator bought in a store and made by yourself), you can say that benefit at least threefold. If you do not buy automatics, the difference will be even greater. Of course, what you make up will have and minuses: does not look so aesthetically pleasing, perhaps not such a long service life.Despite this, many prudent owners prefer make an incubatorand not buy.
Comparing the material from which the body is made incubator, we can say that foam incubator has the lowest heat loss from cardboard box - the cheapest. Of what material you will make - it's up to you to decide.
Very informative article. There is another way to make an incubator. From the beehive: in the lower case of the double-hive hive a hole is cut for the tray, the bottom of which is tightened with a net to circulate air. Under the tray they put water in a wide jar. For air circulation, the ceiling of the upper case is also tightened with a net. On this ceiling there are light bulbs (two on both sides)
Yes, I also tried to do it with my own hands for a long time, but there was always trouble with tightness to maintain the temperature ... In the end, I still had to buy 🙂 But I’m sorry for the money, so I’ll try to do something with your instructions, suddenly it will turn out
I had a self-made, but without the automatic conversion of eggs.It was a troublesome business, so I had to buy a sititek automatic incubator and make my life easier. This year I want to try laying ostrich eggs.