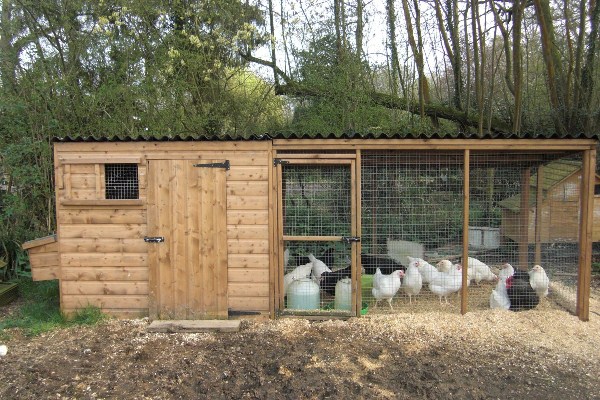
Many people consider breeding chickens as a business idea in the countryside. The benefit is twofold: there is dietary meat and an egg. If you decide to put into practice your own calculations of the profitability of this type of activity or you want to have ten fresh eggs on hand and a baked chicken for a holiday, then you need to either adapt the barn in the village (at the cottage) or build a house for the bird with your own hands.
Investment volume and labor costs depends on many factors: the specific materials taken for construction, the size of the building itself (depending on the number of livestock), etc. Say at once: in this article we will not talk about the breeds of chickens, their diet and breeding methods.The article intends to acquaint the reader with how to build a mini chicken coop with his own hands.
Table of contents
Mini chicken coop with 3 to 5 hens, scheme
In fact, if you decide to acquire such a modest number of poultry, there can be no question of a business project. It is unlikely that you will satisfy your own needs in such a product as egg. However, it all starts small. Try your hand as a novice poultry farmer and with such feathered farm.
For keeping 3 -5 chickens there is no need to have a specially built winter room. You can use the free space in the shed, making a simple mobile design. So, to build a small chicken coop for so many chickens we will need following materials:
- welded mesh fine-meshed;
- polycarbonate;
- plywood;
- flat slate;
- metal shaped tube 15x15 mm.
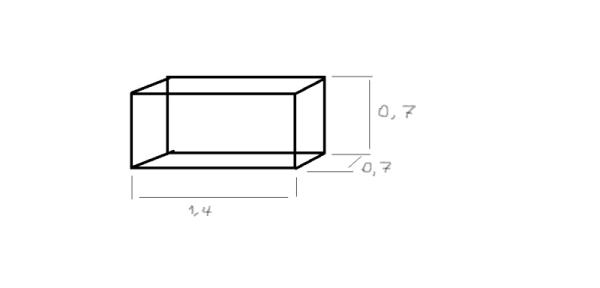
For the design of such chicken coops, you can limit the total amount of space in 0.5 - 0.7 cubic meters. For convenience, select the following cage dimensions: length - 0.7 m., width - 1.4 m., height - 0.7 m.
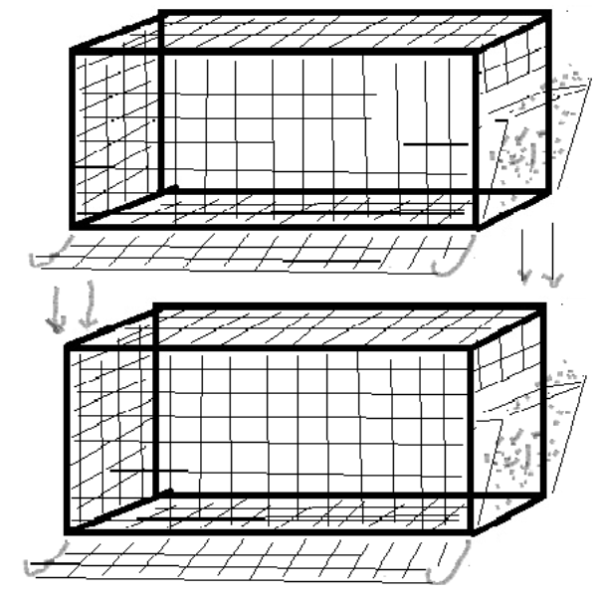
Step one: Weld frame cells by the specified dimensions in the drawing of a metal shaped tube 15x15 mm (Fig. 1).
Step two: If you place the cage closer to the window, then the back and side walls of the cage are made of plywood. Ahead we make a wall of fine-welded mesh. Bottom - two-level. First, to the frame at a distance of 20 cm from the lowest point of the structure, we fix the welded mesh under a slight slope so that the eggs can roll into the egg-picker, and then we fix the pallet of plywood or flat slate to the bottom of the frame. Can be adapted as a material on the pallet and polycarbonate. In the process of vital activity, litter from chickens freely falls through the mesh bottom onto the pallet. Once or twice a month the pallet is cleaned. As a pallet, it is better to use flat slate, because plywood eventually exfoliates due to moisture ingress on it.
Side walls cells are also made from a mesh mesh if there is no plywood on hand or insufficient room lighting. The front side of this mini-chicken coop is also made from the grid. We can fix it to the steel structure rigidly, can be made in the form of an opening door.
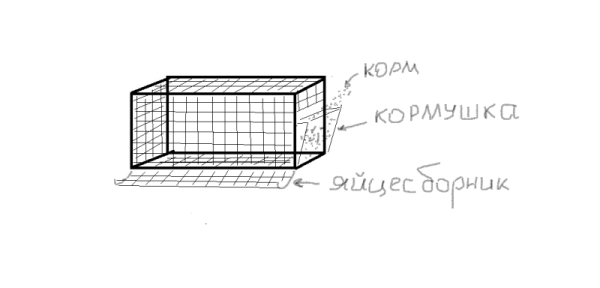
Step Three: We attach the egg collector with ordinary clamps to the grid that is on the floor and install the feeder on the front or side of the cage. It is not necessary to fix the egg harvester. During the cleaning of the cage (cleaning the pallet) it is slightly raised. Then it will be more convenient to clean the pallet. Inside the cage we put the drinker. We make the egg harvester from the same material as the bottom - fine-meshed welded wire mesh. We make a feeder plywood or polycarbonate, the scheme of which is presented below (Fig. 2).
It remains only to install a portable cage at the selected location. Mini coop ready!
Mini chicken coop cage for 10-20 chickens, scheme
If you want to increase the number of poultry to 20 pieces, then you will need 3 - 4 such cells. Use the same material as in the first case. The cells themselves can be placed in different ways:
- We put cells on each other. in 2 rows (Fig.3).
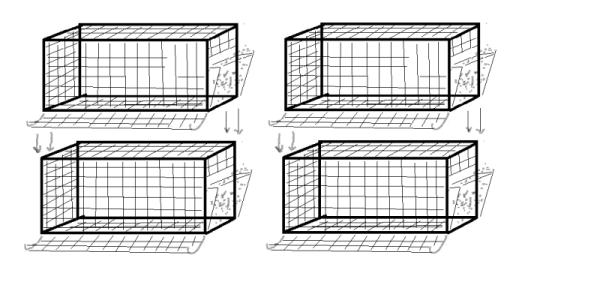
- We put cells on each other. in 1 row (Fig.4).
Depending on the availability of free space in the shed, other factors, we select the option that is suitable for us.
However, if you initially build a mini coop that is designed for livestock in 10-20 chickens, you can just make two designs of large cells. And the size itself will depend on the number of livestock, on what breed you are going to have, other factors. Approximately the specified number of birds makes a chicken coop with a volume of up to 2 cubic meters.
Chicken coop cage for 50-100 chickens, scheme
If you decide to start so many birds, then you are clearly aiming at selling surplus products (and you will undoubtedly have one) with a view to making a profit.If your region has cold enough winters, then you can’t do without a warm chicken coop. It can be built quite quickly, using various construction and roofing materials at hand: brick, rubble, saman, slate, metal profile, etc. If funds permit, more expensive material is used. For a flock of birds up to 100 individuals, a chicken coop with a size of 30 square meters is built.
Building a winter mini chicken coop
- We dig out foundation.
- Fill it concrete.
- Do screed on the floor.
- Expel base.
- Expel wallsinsert doors and windows.
- Do the roof.
It is possible to familiarize with features of construction of household premises in detail on various sites on the Internet.
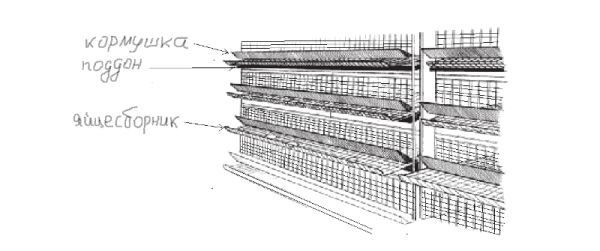
Cages inside a chicken coop install racks up to the ceiling for the rational use of space (Fig.5).
Leave the passage in the middle of the room is not very narrow, because it will be your work space.
Internal dimensions of the room at the rate of up to hundreds of livestock, there can be 4 x 7.5 m. or 4.5 x 7 m. (Fig. 6).

Cell constructions there are various. It is possible to choose the option indicated above by placing the cage for the bird in a longline manner.
You can complicate the task for yourself, but make your hens more comfortable house. To do this, place inside the cells 1-2 perches and make additional sections for nests. In this case, you do not need to attach the egg sampler to the cage - the eggs are removed from the nests manually.
If you build chicken coop for laying hens, and decided to take care of convenient nests, you will need to make wooden boxes. Plywood is also suitable for this purpose. They can be filled with sawdust, but it is better if it is small-cut straw. They are located in the far part of the mini-poultry house (cage). If the height of the cage is small (up to 70 cm), the nests should be located at a height of about 20 cm from the floor. If the height of the cage implies a higher structure, the nests are raised higher.
If the cells are arranged as shown in Figure 5., drinking water can be done in common for each tier of one row of PVC pipe.
Winter mini chicken coop with a walk, drawing
There are no fundamental differences in the construction of this type of chicken coop. However, it has a number of significant differences indoors, a plan of which is given below. If in the above proposed variant the content of hens in cages was suggested, then winter chicken coop practically does not have them. Design feature The internal arrangement is such that the whole room is divided into two parts: walking and nesting (Fig.7).
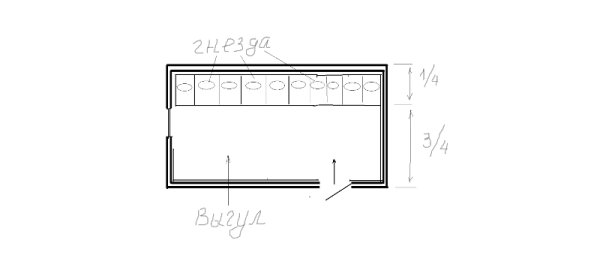
This option of a mini chicken coop for birds is preferable: she feels much more comfortable. However, you are losing in the usable area of the room, because if you can keep more than 100 units of livestock on 30 square meters with a cage content, then with the second option - no more than 50 units.
Summer aviary chicken coop drawing
For increasing egg production can be done in the summer at the site of a mini-aviary chicken coop.
The principal differences from the mini chicken coop located in the barn:
- there is space for free bird walking;
- designed for spring-summer-autumn period.
Design features aviary coop
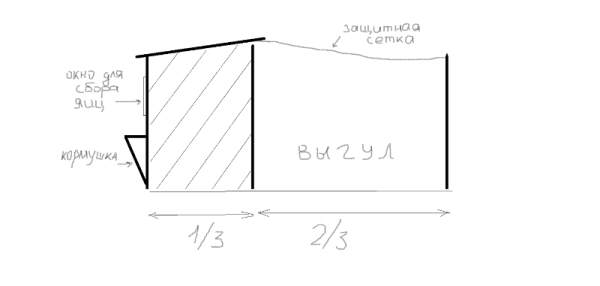
The size of the enclosure varies depending on the number of poultry. Without fail There are 2 parts in the aviary: a walking section and a section in which chickens feed and feed. The section for walking, as a rule, is 2 times larger in area of the most covered poultry house (Fig. 8).
There are two types of chicken coop:
1 - stationary;
2 - mobile.
Build a chicken coop
Step 1: We weld a design from a profile pipe 50 - 70 mm. Instead of a profile metal pipe, you can use a wooden beam.
Step 2: We put on a piece of metal a chain-link or galvanized welded mesh with a cell to 50 mm. We do this in the walking section of the bird. From above we stretch a protective mesh. The entrance to the hill is preferably done from the opposite side of the covered part of the chicken coop.
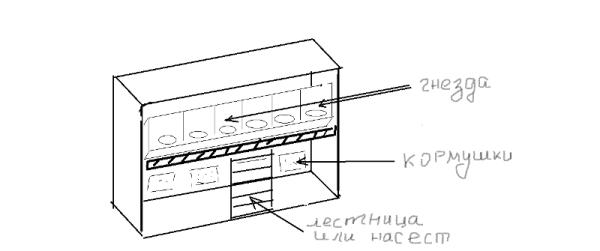
Step 3: Plywood or particleboard we build the second part of the chicken coopin which the bird will eat and be carried. In the same part we do perches and nest sections. Instead of perches, you can use a constructed ladder or ladder, the device of such a chicken coop is presented below. This is true for older chickens (over one and a half years) (Fig. 9).
Feeders we do from the back side of the covered section so that they open out to fill the feed in them and can be closed “flush”. To the bottom, such a box-feeder is narrowed enough so that at the end there is a gap for spilling food into a fixed part of a separately fed from the inside of the food tray. Drinking bowl we make from PFH a sewer pipe with holes so that the bird can drink from it. Hard to fix it is not necessary. If necessary, one end of the pipe that goes outside can be lowered onto the ground to drain water. This section can be made in the form of a box that has walls on all sides, even from the side of the walk.
Without fail, this part of the coop must have a roof. This section can be covered with a metal profile sheet or regular slate. Desirable to solve sound insulation issue, because if you use a metal profile sheet as a roof, the sound inside this section will be very strong during rain, which in turn will scare the bird that lays eggs. The roof can also be made of polycarbonate, but this option has a number of drawbacks, namely, polycarbonate under direct sunlight decays quickly, and, most likely, after two or three years, the roof needs to be changed. In addition, the bird rushes better in a secluded dark place. Polycarbonate It has a transparent structure, it will allow too much light into the nest of the chicken coop.
If the number of chickens you do not exceed 20 goals, you can do summer mini coop of this size:
Total area: up to 15 square meters, including open-air cage 10 square meters chicken coop - 5 square meters.
With the increase in poultry stock coop size increase, the correct size can be seen in the table below:
| Number of poultry | Total size of the house, sq.m | Including | |
| sector for walking, sq.m | Coop, sq.m | ||
| to 10 | 10,0 | 6,0 | 4,0 |
| from 15 to 20 | 15,0 | 10,0 | 5,0 |
| from 40 to 50 | 40,0 | 25,0 | 15,0 |
| from 70 to 80 | 60,0 | 40,0 | 20,0 |
| 100 | 75,0 | 50,0 | 25,0 |
We hope that this article has helped you decide type mini coop and suggested some nuances and make bird care easy and effective. The rest will come with experience.
During construction, it is worth thinking about how the feeders and the place for storing food from rodents will be protected during the cold season. And sometimes rats and chickens attempt! As an option for more solid buildings - a layer of min.vaty on the walls.
Helen, mineral wool for warming, yes, good. And from rodents well help ... cats.